Create an Image Template on Openstack
I would like to share my experience about creating an image template on Openstack.
Note:
- Maybe this is not a standard nor best practice for Openstack, but it works well with me. Please comment, or share you view to get a better option to create a VM template.
- qemu-kvm used on this post.
- OS used on this environment is SuSE 11 SP4.
- I used TigerVNC as an VNC Client. It’s available to download TigerVNC.
Preparation
First you need to upload installation source such as .iso file or .img file to Openstack controller. Also upload UVP vmtool, which is Virtio KVM Driver.
Create image file
Create image file with command below:
qemu-img create -f qcow2 win2012.qcow2 40G
Where:
- -f used to specify file format, I used qcow2.
- win2012.qcow2 is the file name.
- 40G is size of the image. For more detail please read the manual.
Then boot the iso file to image file with this command:
qemu-kvm -name winser2012 -machine pc-i440fx-2.1,accel=kvm -cpu host -m 4096 -smp 4,sockets=1,cores=4,threads=1 -hda win2012.qcow2 -cdrom winser.iso -boot d -vnc :1 -device piix3-usb-uhci,id=usb,bus=pci.0 -redir tcp:2233::2
Where:
- -name winser2012 used to sets the name of the guest, I used winser2012.
- -machine pc-i440fx-2.1,accel=kvm used to select emulated machine by name, I used Standard PC (i440FX + PIIX, 1996) and KVM as accelerator.
- -cpu host -m 4096 -smp 4,sockets=1,cores=4,threads=1, that’s mean I used CPU type host with memory 4GB; simulate an SMP system with 4 CPUs, 1 socket, 4 cores, and 1 thread each core.
- -hda win2012.qcow2 -cdrom winser.iso -boot d, that mean I used hda mounted with an image that I have created before, mount cdrom drive with windows server iso, and boot it to cd-rom (D:).
- -vnc :1 used for listen on VNC display and redirect the VGA display over the VNC session. TCP connections will only be allowed from host on display 1.
- -device piix3-usb-uhci,id=usb,bus=pci.0 is to device driver. For more detail please read the manual.
VNC Operation
Usually qemu-kvm generates random port above 5900, so to get the port, you can query the port with this way:
Query PID of qemu-kvm
$ ps -ef | grep "qemu-kvm -name winser2012"
root     10972 11751  0 09:28 pts/1    00:00:00 grep qemu-kvm -name winser2012
root     28729 48606 52 09:18 pts/3    00:05:15 qemu-kvm -name winser2012 -machine pc-i440fx-2.1,accel=kvm -cpu host -m 4096 -smp 4,sockets=1,cores=4,threads=1 -hda win2012.qcow2 -cdrom winser.iso boot d -vnc :1 -device piix3-usb-uhci,id=usb,bus=pci.0 -redir tcp:2233::2
PID 28729 is PID of qemu-kvm process.
Get qemu-kvm listening port
$ netstat -lp | grep 28729
tcp        0      0 *:infocrypt             *:*                     LISTEN      28729/qemu-kvm
tcp        0      0 *:24900                 *:*                     LISTEN      28729/qemu-kvm
Where: 24900 is qemu-kvm listening port.
After that open TigerVNC client, and type openstack controller IP address with the port.

Then install the OS based on OS installation wizard.
Installing VirtIO driver
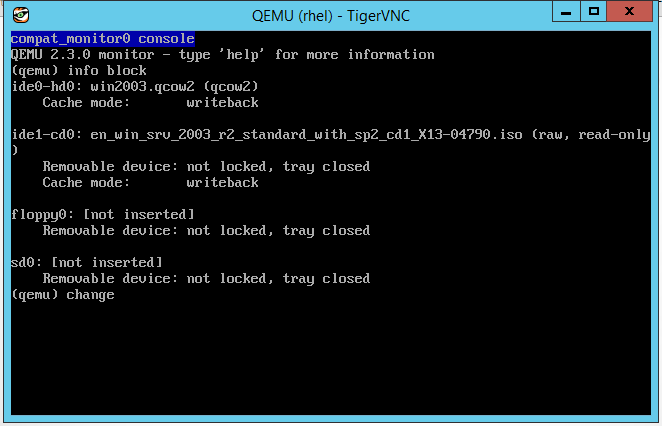
If VirtIO driver need to be installed, you can install it without shutdown the emulation. Press CTRL + ALT + 2, then change it with these commands:
Check where DVD was mounted
info block

Change DVD
change ide1-cd0 <iso directory>

Press CTRL + ALT + 1 to back to VNC main screen.
Upload Image to Glance
After VM template ready, shutdown the VM, then start upload the image to Glance.
Upload image to Glance with this command:
glance image-create --name winser_2012_r2 --file win2012.qcow2 --disk-format qcow2 --container-format bare --progress
Where:
- –name winser_2012_r2, to specify the image name, I chose winser_2012_r2. This option is optional.
- –file win2012.qcow2, image name that need to be uploaded.
- –disk-format qcow2, to specify disk format, I was used qcow2.
- –container-format bare, to specify container format, I was used bare.
- –progress to show upload progress bar. This option is optional.
And here are the result:
$ glance image-create --name winser_2012_r2 --file win2012.qcow2 --disk-format qcow2 --container-format bare --progress
+------------------+--------------------------------------+
| Property         | Value                                |
+------------------+--------------------------------------+
| checksum         | 289a81bef8744809093f008e1512ccb0     |
| container_format | bare                                 |
| created_at       | 2017-07-12T10:38:00.675637           |
| deleted          | False                                |
| deleted_at       | None                                 |
| disk_format      | qcow2                                |
| id               | d6804d69-c212-48c4-b32f-2718d3b18857 |
| is_public        | False                                |
| min_disk         | 0                                    |
| min_ram          | 0                                    |
| name             | windows_server_2012_r2               |
| owner            | a858a61d283f400ca2c63682b86da203     |
| protected        | False                                |
| size             | 8039628800                           |
| status           | active                               |
| updated_at       | 2017-07-12T10:40:58.314197           |
| virtual_size     | None                                 |
+------------------+--------------------------------------+
Update image metadata. This step is optional.
glance image-update d6804d69-c212-48c4-b32f-2718d3b18857 --is-public true --min-disk 40 --min-ram 1024 --owner bf71881fc8bc4eb6b4a18b4c67466b0c --property 'virtual_env_type'=KVM
Where:
- –is-public true, to make image become accessible by public.
- –min-disk 40, to note that minimum disk used is 40GB.
- –min-ram 1024, to note that minimum RAM is 1024MB.
- –owner bf71881fc8bc4eb6b4a18b4c67466b0c, to change the owner.
- –property ‘virtual_env_type’=KVM to specify that this image is KVM based image.
And the result is:
$ glance image-update d6804d69-c212-48c4-b32f-2718d3b18857 --is-public true --min-disk 40 --min-ram 1024 --owner bf71881fc8bc4eb6b4a18b4c67466b0c --property 'virtual_env_type'=KVM
+-----------------------------+--------------------------------------+
| Property                    | Value                                |
+-----------------------------+--------------------------------------+
| Property 'file_name'        | **.qcow2                             |
| Property 'virtual_env_type' | KVM                                  |
| checksum                    | 289a81bef8744809093f008e1512ccb0     |
| container_format            | bare                                 |
| created_at                  | 2017-07-12T10:38:00.675637           |
| deleted                     | False                                |
| deleted_at                  | None                                 |
| disk_format                 | qcow2                                |
| id                          | d6804d69-c212-48c4-b32f-2718d3b18857 |
| is_public                   | True                                 |
| min_disk                    | 0                                    |
| min_ram                     | 0                                    |
| name                        | windows_server_2012_r2               |
| owner                       | a858a61d283f400ca2c63682b86da203     |
| protected                   | False                                |
| size                        | 8039628800                           |
| status                      | active                               |
| updated_at                  | 2017-07-21T08:18:50.255517           |
| virtual_size                | None                                 |
+-----------------------------+--------------------------------------+